
NRG Sunhoods & Blades:
NRG Sunhoods & Blades, will enhance the architectural appearance of modern building design, whilst providing both ‘shading’ and ‘weather’ protection over windows and doors.
NRG Sunhood & Blades designed simplicity, allows for speedy installation and finished with an extensive choice of textures and colour finishes.
SELECT: OPTION (1.) PRE- FINISHED POLYURETHANE HARDCOAT ... (Non Rendered)
OPTION (2.) POLYMER RENDERED ... (see "Installation Guides" .... 12 point / step Install )
All importantly, NRG Sunhood & Blades assist designers and builders in complying with BCA 2006 – 3.12.2.2 – Volume Two – Shading.
|
Hood Face Rear
Blade Dimension Dimension
|
|
|
|
|---|---|---|---|
|
300mm 120mm to 170mm 140mm to 210mm
|
|
|
|
|
450mm 120mm to 170mm 140mm to 210mm
|
|
|
|
|
600mm 120mm to 170mm 140mm to 210mm
|
|
|
|
|
750mm 140mm to 170mm 160mm to 210mm
|
|
|
|
|
900mm 170mm 210mm
|
|
|
|
NOTE: SUNHOODS REQUIRE WATERPROOFING: |
|
|
|
|
Blades 120mm to 210mm
|
|
|
|
* ( Consult engineer for site specific installation.)
NRG Profile Mouldings: (Polyurethane Hardcoat)
NRG polyurethane (hardcoat) Sunhoods, Blades and profile mouldings, are the alternative coating system finish. Requiring no rendering, as the EPS profile, is factory pre-finished. This system requires specialised, specific skill installation. Interstate or regional project logistics can be factored in as required...
Please select from the NRG Coded samples below: (Lengths supplied @ 2.4 Lm)
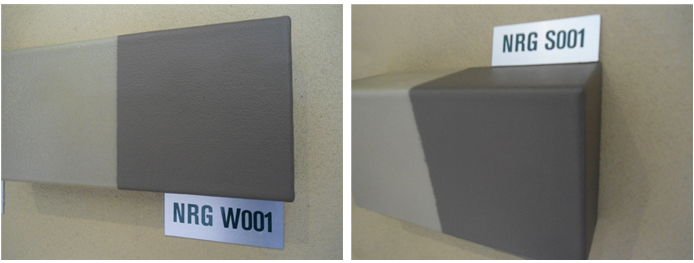
W001: 100mm x 30mm S001: 114mm x 70mm (WINDOW SILL)
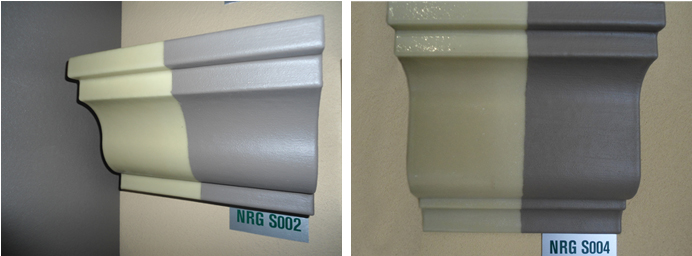
S002: 140mm x 130mm S004: 200mm x 100mm
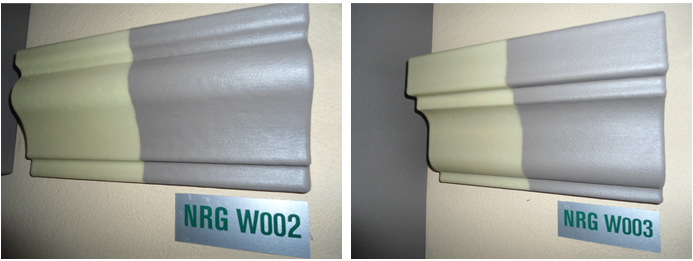
W002: 100mm x 30mm W003: 120mm x 60mm
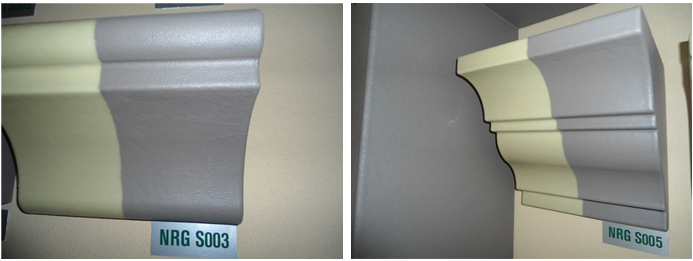
S003: 150mm x 120mm S005: 200mm x 165mm
The above profiles are from our select range. NRG can accommodate 'a specific nominated profile' of the clients choice, if the need arises. Please contact 'Free call' 1800NRG001 to discuss your project requirements.
NRG POLYURETHANE HARDCOTE MOULDINGS INSTALLATION GUIDE
(Please read and follow the step by step instructions carefully.)
STEP 1 - TOOLS REQUIRED:
Make sure you have the right tools for the job. The following is a list of the tools you may need.
| • Tape Measure | • Combination Square | • Utility Knife | • Methylated Spirits |
| • Caulking gun | • 75mm Broad knife | • Handsaw | • Rags |
| • Nails or screws | • Chalk line (straight runs) | • Pencil | • Mixing Board (Container) |
STEP 2 - GLUES REQUIRED:
| A: Construction adhesive | Bostik “No More Nails” | |
|
B: Sealant - Primary fixing
C: Joining compound |
Bostik “Seal'n'Flex” West system “Epoxy” (see below) |
PUMP PACK KIT:
West Pump pack: ............ 1.2 litre (5:1 set) Visit : www.westsystem.com.au for additional technical assistance.
Part (a): 105 Resin ......... 1.0 litre
Part (b): 206 Hardener.... .200ml (slow)
Part (c): 403 Powder .... 1.0 litre Microfibre Blend (1st 'coarse' filler application)
411 Powder .....1.0 litre Microfibre Blend (Final fine filler)
STEP 3 - SET OUT:
Determine positional height set out for intended profile, and ensure all markings to the wall substrate are level and vertically plumb. For continuous profiles, use a water level or 'dumpy level' combined with a chalk line. This will ensure the end product to a professional finish.
STEP 4 - CUTTING THE MOULDING:
Our first step is to make sure that our surfaces are clean and dry, note any dust or moisture has a detrimental effect on the glues ability to adhere. It is only recommended to install mouldings on flat substrates, eg Rendered NRG, Masonry or FC.
The first lengths of moulding you install should be any with internal mitres followed by any lengths needing external mitres, then fill in the area between. If you follow this procedure it will give neater mitres and better lines. When measuring the length to cut a mould, always mark the mould on the surface being adhered to the building. Once you have marked the mould at the right length, use you combination square to mark you cut lines. To cut the mould, first cut through the top section of urethane, then down the back edge of the mould. By cutting through these two edges first you will be approximately half way though the mould. The rest of the cut will follow the line created by your first cut being marked with your combination square ensuring a neat cut.
STEP 5 - APPLYING THE MOULDING:
When you have cut the mould to length apply 20mm dabs of construction adhesive at every 100-200mm spacings on the surfaces being fixed to the building. Take the length and press firmly into position, now bring the mould about 20-30mm from the surfaces and allow the glue to tack off for 30-40 seconds. After the adhesive has tacked off you can then place the length of mould into its final position. Note: it is best if you leave a 1mm gap between each length for you joining compound to bond. Make sure you get full contact of all the adhesive and that you press the mould into position.
STEP 6 - SEALING THE MOULDING:
Now that the mould is in place, Polyurethane sealant (Bostik Seal'n'flex 1) needs to be applied by running a 3-5mm bead along the 2 external edges top and bottom of the mould as a jointseal and smoothed over with your finger. It is recommended that you seal all lengths of moulding the day you install the lengths. Remember that the construction adhesive is only used to hold the product in place while the sealant-primary fixing is curing (approximate 1mm per 24 hours). This procedure is a "Joint-Seal' application, and requires a thorough, neat approach, to assist with final paint applications.
STEP 7 - JOINING THE MOULDING:
After the mouldings have been sealed for a minimum of 12 hours you are ready to start the joining of the moulding. The joining process is achieved using the “WEST SYSTEM”, which is a 2 part liquid resin, mixed with a microfibre powder. Before mixing this product read carefully the mixing directions on all three of the components. The correct consistencey is achieved by adding small amounts of the microfibre powder to the mixture of resin and stirring in until a putty like texture is achieved. 1st application Micro-fibre 403 Blend (filler) ... 2nd application Micro-fibre 411 Blend. (final fine fibre)
The West System is used not only on all joints and mitres, but to seal any raw ends or other exposed foam and any dints that have been caused during the installation. Once you have mixed the West System in you container apply a coating to the desired area with your broad knife, wipe off excess from the broad knife back into your container and with the now clean broad knife wipe off excess from the moulding. When using the broad knife to wipe off excess joining compound hold your broad knife at a 20-degree angle to the surface and use a firm consistent movement. Note: you may have to wipe the broad knife clean a couple of times to get all the excess off the moulding. It is desirable to leave as little excess as possible on the moulding as when the West is dry it is very hard to sand. It is recommended that the day after using the West system you go back and check all joints to see if any expansion or contraction has upset the joint and sand or re-apply as needed. The importance of using the West System cannot be overstressed. The West System welds the joints together to create a bond stronger than the coating itself and is a basic requirement for a lasting installation.
STEP 8 - PAINTING:
Consult your trade approved paint applicator, to complete your detailed NRG Profile Moulding.
Please Note: It is highly recommended for exterior paint applied finish application to NRG Polyurethane Hardcote mouldings, that an exterior 'Sand based' Acrylic paint is applied to neutralise and assist with: (1) Jointing . (2) Fixing patching. (3) Potential production inconsistencies. Failure to use a 'Non-Sand Based Acrylic' may result in direct and glancing light imperfections.
See more samples of finished projects CLICK HERE